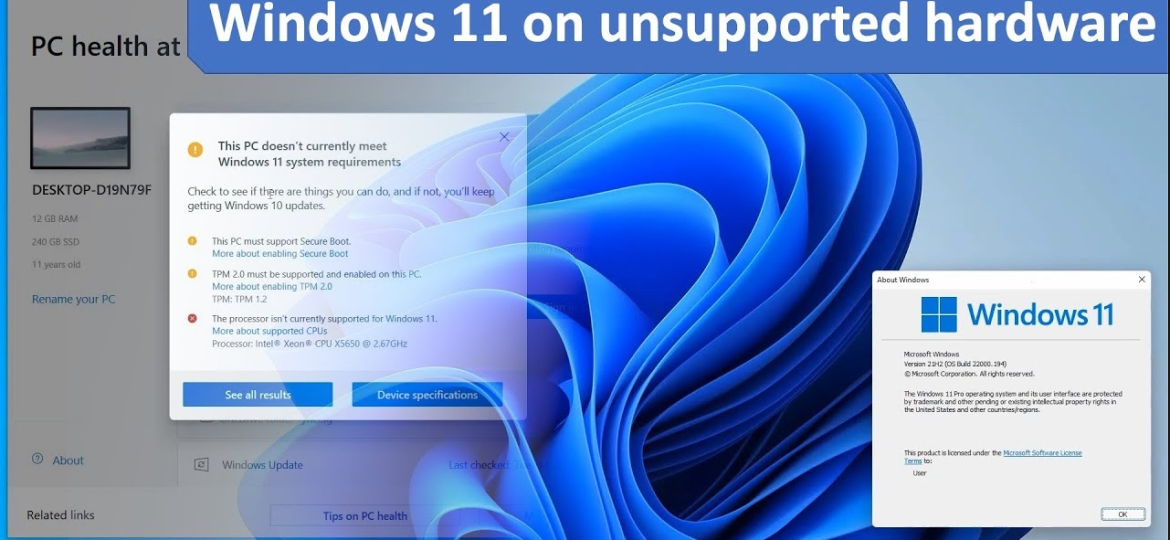
Installing Windows 11 on a machine that doesn’t meet Microsoft’s official system requirements is possible, but it comes with significant risks and potential stability issues. Microsoft strongly recommends against installing Windows 11 on unsupported hardware, as it may lead to compatibility problems and a lack of security updates.
Understanding the Risks
Before proceeding, it’s crucial to understand that installing Windows 11 on unsupported hardware can result in:
• Lack of Support: Devices that don’t meet the minimum system requirements won’t receive support from Microsoft, and you should be comfortable assuming the risk of running into compatibility issues.
• Potential Stability Issues: Unsupported installations may experience system instability, crashes, or other unpredictable behavior.
• Security Vulnerabilities: Your device may not receive critical security updates, leaving it exposed to potential threats.
Steps to Install Windows 11 on Unsupported Hardware
If you decide to proceed despite the risks, follow these steps:
1. Backup Your Data: Ensure all important data is backed up to prevent loss during the installation process.
2. Download Windows 11 ISO: Obtain the official Windows 11 ISO file from Microsoft’s website.
3. Create a Bootable USB Drive: Use a tool like Rufus to create a bootable USB drive with the Windows 11 ISO.
4. Modify Registry to Bypass Checks: Before installation, you’ll need to modify the registry to bypass hardware compatibility checks. This involves adding specific registry keys to disable TPM 2.0 and Secure Boot checks.
• Press Shift + F10 during the Windows setup to open Command Prompt.
• Type regedit and press Enter to open the Registry Editor.
• Navigate to HKEY_LOCAL_MACHINE\SYSTEM\Setup.
• Right-click on Setup, select New > Key, and name it LabConfig.
• Within LabConfig, create new DWORD (32-bit) values:
• BypassTPMCheck and set its value to 1.
• BypassSecureBootCheck and set its value to 1.
• BypassRAMCheck and set its value to 1.
• Close the Registry Editor and proceed with the installation.
5. Install Windows 11: Boot from the USB drive and follow the on-screen instructions to install Windows 11.
Considerations
While it’s technically possible to install Windows 11 on unsupported hardware, it’s generally not recommended due to the potential issues outlined above. If your current hardware doesn’t meet the requirements, consider upgrading your PC or continuing to use Windows 10, which is supported until October 14, 2025. Installing Windows 11 on a machine that doesn’t meet Microsoft’s official system requirements is possible, but it comes with significant risks and potential stability issues. Microsoft strongly recommends against installing Windows 11 on unsupported hardware, as it may lead to compatibility problems and a lack of security updates.
Understanding the Risks
Before proceeding, it’s crucial to understand that installing Windows 11 on unsupported hardware can result in:
• Lack of Support: Devices that don’t meet the minimum system requirements won’t receive support from Microsoft, and you should be comfortable assuming the risk of running into compatibility issues.
• Potential Stability Issues: Unsupported installations may experience system instability, crashes, or other unpredictable behavior.
• Security Vulnerabilities: Your device may not receive critical security updates, leaving it exposed to potential threats.
Steps to Install Windows 11 on Unsupported Hardware
If you decide to proceed despite the risks, follow these steps:
1. Backup Your Data: Ensure all important data is backed up to prevent loss during the installation process.
2. Download Windows 11 ISO: Obtain the official Windows 11 ISO file from Microsoft’s website.
3. Create a Bootable USB Drive: Use a tool like Rufus to create a bootable USB drive with the Windows 11 ISO.
4. Modify Registry to Bypass Checks: Before installation, you’ll need to modify the registry to bypass hardware compatibility checks. This involves adding specific registry keys to disable TPM 2.0 and Secure Boot checks.
• Press Shift + F10 during the Windows setup to open Command Prompt.
• Type regedit and press Enter to open the Registry Editor.
• Navigate to HKEY_LOCAL_MACHINE\SYSTEM\Setup.
• Right-click on Setup, select New > Key, and name it LabConfig.
• Within LabConfig, create new DWORD (32-bit) values:
• BypassTPMCheck and set its value to 1.
• BypassSecureBootCheck and set its value to 1.
• BypassRAMCheck and set its value to 1.
• Close the Registry Editor and proceed with the installation.
5. Install Windows 11: Boot from the USB drive and follow the on-screen instructions to install Windows 11.
Considerations
While it’s technically possible to install Windows 11 on unsupported hardware, it’s generally not recommended due to the potential issues outlined above. If your current hardware doesn’t meet the requirements, consider upgrading your PC or continuing to use Windows 10, which is supported until October 14, 2025.
Conclusion
Proceeding with the installation of Windows 11 on unsupported hardware should be done with caution and a full understanding of the associated risks. Ensure you have adequate backups and are prepared to face potential system instability or lack of support.